ROS2 6일차(1) URDF
2024. 9. 27. 12:46ㆍROS2/URDF
https://today-study625.tistory.com/59
ROS2 5일차(1) URDF
복잡한 urdf를 작성하기에 앞서 미리 간단한 것들로 urdf문법에 익숙해지려 한다. https://with-rl.tistory.com/entry/URDF%EB%A5%BC-%EC%9D%B4%EC%9A%A9%ED%95%9C-%EA%B0%84%EB%8B%A8%ED%95%9C-%EB%A1%9C%EB%B4%87-%EB%A7%8C%EB%93%A4%EA%B8%B
today-study625.tistory.com
이어서 작성!
4. Caster Wheel 추가
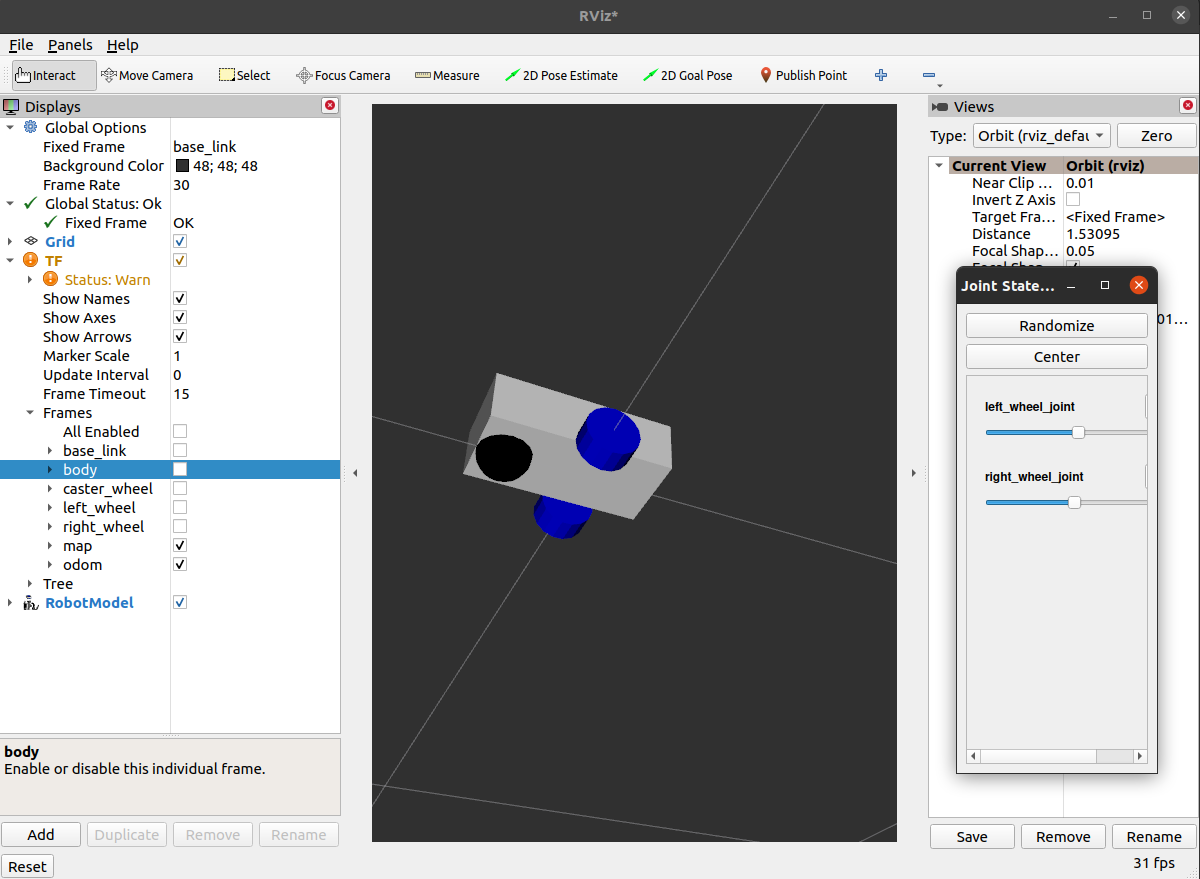
- 지금 만들고 있는 자동차는 바퀴 두 개에서 발생하는 간단한 자동차이다. 동력이 없고 자동차가 넘어지지 않도록 하는 보조 바퀴 caster_wheel을 추가하는 과정
- robot_2.xacro 파일의 내용을 아래와 같이 편집
- caster_wheel_joint는 body에 'fixed' 형식으로 부착. caster_wheel이 body 뒤쪽에 위치하도록 x축 방향으로 3cm 이동
- caster_wheel의 크기는 반지름 3cm인 구
- caster_wheel의 색깔은 검은색
<?xml version="1.0"?>
<robot xmlns:xacro="http://www.ros.org/wiki/xacro" name="urdf_tutorial">

    <!-- COLOR -->
    <material name="white">
        <color rgba="1 1 1 1" />
    </material>

    <material name="blue">
        <color rgba="0 0 1 1"/>
    </material>

    <!-- BASE LINK -->
    <link name="base_link">
    </link>

    <!-- BODY LINK -->
    <joint name="body_joint" type="fixed">
        <parent link="base_link"/>
        <child link="body"/>
        <origin xyz="-0.12 0 0"/>
    </joint>

    <link name="body">
        <visual>
            <origin xyz="0.1 0 0.03"/>
            <geometry>
                <box size="0.2 0.1 0.06"/>
            </geometry>
            <material name="white"/>
        </visual>
    </link>

    <!-- LEFT WHEEL LINK -->
    <joint name="left_wheel_joint" type="continuous">
        <parent link="base_link"/>
        <child link="left_wheel"/>
        <origin xyz="0 0.065 0" rpy="-${pi/2} 0 0" />
        <axis xyz="0 0 1"/>
    </joint>

    <link name="left_wheel">
        <visual>
            <geometry>
                <cylinder radius="0.03" length="0.03"/>
            </geometry>
            <material name="blue"/>
        </visual>
    </link>

    <!-- RIGHT WHEEL LINK -->
    <joint name="right_wheel_joint" type="continuous">
        <parent link="base_link"/>
        <child link="right_wheel"/>
        <origin xyz="0 -0.065 0" rpy="${pi/2} 0 0" />
        <axis xyz="0 0 -1"/>
    </joint>

    <link name="right_wheel">
        <visual>
            <geometry>
                <cylinder radius="0.03" length="0.03"/>
            </geometry>
            <material name="blue"/>
        </visual>
    </link>

    <!-- CASTER WHEEL LINK -->
    <joint name="caster_wheel_joint" type="fixed">
        <parent link="body"/>
        <child link="caster_wheel"/>
        <origin xyz="0.03 0 0"/>
    </joint>

    <link name="caster_wheel">
        <visual>
            <geometry>
                <sphere radius="0.03"/>
            </geometry>
            <material name="black"/>
        </visual>
    </link>

</robot>
# Terminal 1
ros2 launch urdf_tutorial robot_2.launch.py
# Termianl 2
rviz2
# Terminal 3
ros2 run joint_state_publisher_gui joint_state_publisher_gui
5. Collision 추가하기
- 이전 과정에서 만든 것은 자동차의 모형이다. 현재 상태는 주행하다가 장애물을 만나면 그대로 통과한다. 충돌을 시뮬레이션 하기 위해 collision을 추가
- robot_2.xacro 파일의 내용을 아래와 같이 편집. 이번에 만드는 간단한 자동차는 외형과 충돌 부위가 동일하므로 visual과 동일한 모양으로 collision을 만들어준다

Visual Enabled를 비활성화하고 Collision을 활성화해도 동일한 모양이 나온다.
6. 관성 모멘트 추가
- 자동차의 물리적인 특성을 계산할 수 있는 관성 모멘트를 추가
- 주요 형상에 대한 관성 모멘트의 계산식은 https://en.wikipedia.org/wiki/List_of_moments_of_inertia 에서 확인가능
- 'src/urdf_tutorial/urdf/macros.xacro' 파일 만들고 아래와 같이 편집
macros.xacro
<?xml version="1.0"?>
<robot xmlns:xacro="http://www.ros.org/wiki/xacro" >

    <!-- Specify some standard inertial calculations https://en.wikipedia.org/wiki/List_of_moments_of_inertia -->
    <!-- These make use of xacro's mathematical functionality -->

    <xacro:macro name="inertial_sphere" params="mass radius *origin">
        <inertial>
            <xacro:insert_block name="origin"/>
            <mass value="${mass}" />
            <inertia ixx="${(2/5) * mass * (radius*radius)}" ixy="0.0" ixz="0.0"
                    iyy="${(2/5) * mass * (radius*radius)}" iyz="0.0"
                    izz="${(2/5) * mass * (radius*radius)}" />
        </inertial>
    </xacro:macro>


    <xacro:macro name="inertial_box" params="mass x y z *origin">
        <inertial>
            <xacro:insert_block name="origin"/>
            <mass value="${mass}" />
            <inertia ixx="${(1/12) * mass * (y*y+z*z)}" ixy="0.0" ixz="0.0"
                    iyy="${(1/12) * mass * (x*x+z*z)}" iyz="0.0"
                    izz="${(1/12) * mass * (x*x+y*y)}" />
        </inertial>
    </xacro:macro>


    <xacro:macro name="inertial_cylinder" params="mass length radius *origin">
        <inertial>
            <xacro:insert_block name="origin"/>
            <mass value="${mass}" />
            <inertia ixx="${(1/12) * mass * (3*radius*radius + length*length)}" ixy="0.0" ixz="0.0"
                    iyy="${(1/12) * mass * (3*radius*radius + length*length)}" iyz="0.0"
                    izz="${(1/2) * mass * (radius*radius)}" />
        </inertial>
    </xacro:macro>

</robot>
로봇 URDF에서 관성 모멘트(inertia)를 정의하는 이유는 물리 시뮬레이션에서 로봇이 물리적으로 올바르게 동작하도록 하기 위해서 이다. 관성 모멘트는 물체가 특정 축을 중심으로 회전할 때 얼마나 쉽게 또는 어렵게 회전하는지를 나타내는 물리적 속성.
이를 통해 로봇의 운동이 더 현실적으로 시뮬레이션되며, 특히 다이나믹 시뮬레이션에서 중요한 역할을 함
관성 모멘트 추가 이유:
- 정확한 물리 시뮬레이션:
- 로봇이 가속하거나 회전할 때, 힘과 모멘트를 정확하게 계산하기 위해서는 질량뿐만 아니라 관성 모멘트도 필요합니다.
- 이를 통해 로봇의 관절이나 링크가 실제 물리적 특성에 맞게 동작하도록 할 수 있습니다.
- 안정성:
- 관성 모멘트 없이 시뮬레이션을 진행하면, 로봇이 불안정하게 움직이거나 의도하지 않은 동작을 할 수 있습니다.
- 적절한 관성 모멘트를 설정하면, 로봇의 동작이 보다 자연스럽고 안정적이게 됩니다.
- 제어 및 동적 분석:
- 로봇의 각 링크가 회전할 때 필요한 토크 계산에도 관성 모멘트는 필수적입니다. 이를 기반으로 제어 알고리즘을 개선할 수 있습니다.
- 특히 빠른 회전이나 고속 동작이 필요한 경우 관성 모멘트는 매우 중요합니다.
예시:
- **구체 (sphere)**의 관성 모멘트는 회전 대칭적이기 때문에, 모든 축에 대해 같은 값을 가집니다.
- **상자 (box)**는 축에 따라 회전 저항이 다르기 때문에, 각각의 축에 대해 다른 관성 모멘트를 가집니다.
- **원통 (cylinder)**은 중심 축을 기준으로 회전할 때와, 수직 축을 기준으로 회전할 때 다른 관성 모멘트를 가집니다.
'src/urdf_tutorial/urdf/robot_2.xacro' 파일에 'src/urdf_tutorial/urdf/macros.xacro'의 내용을 포함하고 관성 물리적 특성을 지정
- body는 'solid rectangular cuboid' 수식을 사용
- left_wheel, right_wheel은 'solid cylinder' 수식을 사용
- caster_wheel은 'solid sphere' 수식을 사용
'ROS2 > URDF' 카테고리의 다른 글
| ROS2 URDF(4) (0) | 2024.10.04 |
|---|---|
| ROS2 URDF(3) (0) | 2024.09.30 |
| ROS2 6일차(2) URDF (0) | 2024.09.27 |
| ROS2 5일차(2) URDF (0) | 2024.09.26 |
| ROS2 5일차(1) URDF (0) | 2024.09.26 |