ROS2 5일차(2) URDF
2024. 9. 26. 17:03ㆍROS2/URDF
URDF를 이용한 간단한 로봇 만들기 (2)
이번 포스팅은 이전 포스팅에서 구축한 환경을 기반으로 간단한 자동차를 만들어보는 과정입니다. 이 포스트는 다음 영상의 내용을 기반으로 개발하고자 하는 로봇에 적합하게 수정했습니다. C
with-rl.tistory.com
참조

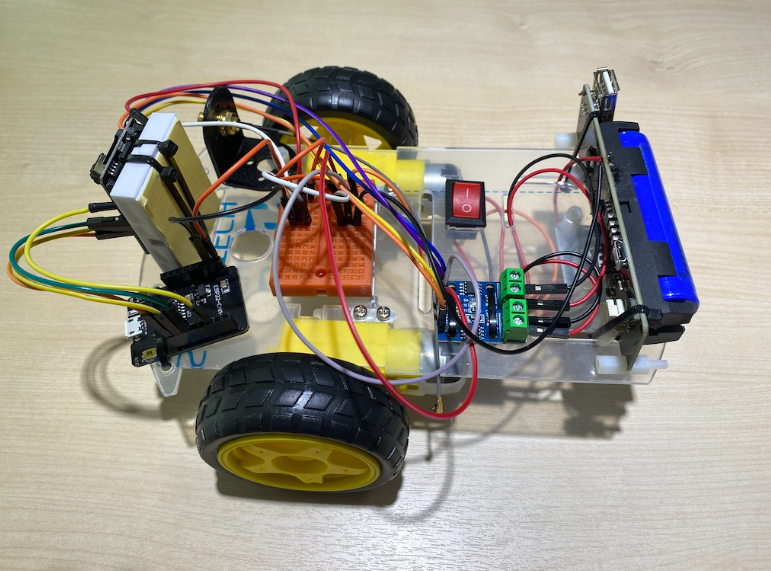
이렇게 생긴 로봇 URDF 파일로 만들어보기
먼저 urdf 폴더에 robot_2.xacro 파일 만들기
조건
- body_joint는 base_link에 'fixed' 형식으로 연결
- body의 크기는 (x,y,z)가 (20cm ,10cm ,6cm)
- body는 base_link에 부착함
- body_joint를 body의 뒷부분에 위치하도록 body를 10cm 이동하고 body_joint를 -12cm만큼 이동(결과 base_link는 body의 8cm 부분)
- body의 색은 흰색
robot_2.xacro
<?xml version="1.0"?>
<robot xmlns:xacro="http://www.ros.org/wiki/xacro" name="urdf_tutorial">

    <!-- COLOR -->
    <material name="white">
        <color rgba="1 1 1 1" />
    </material>

    <!-- BASE LINK -->
    <link name="base_link">
    </link>

    <!-- BODY LINK -->
    <joint name="body_joint" type="fixed">
        <parent link="base_link"/>
        <child link="body"/>
        <origin xyz="-0.12 0 0"/>
    </joint>

    <link name="body">
        <visual>
            <origin xyz="0.1 0 0.03"/>
            <geometry>
                <box size="0.2 0.1 0.06"/>
            </geometry>
            <material name="white"/>
        </visual>
    </link>

</robot>
robot_2.launch.py
import os
from ament_index_python.packages import get_package_share_directory
from launch import LaunchDescription
from launch.substitutions import LaunchConfiguration
from launch.actions import DeclareLaunchArgument
from launch_ros.actions import Node
import xacro

def generate_launch_description():
    use_sim_time = LaunchConfiguration("use_sim_time")

    pkg_path = os.path.join(get_package_share_directory("urdf_tutorial"))
    xacro_file = os.path.join(pkg_path, "urdf", "robot_2.xacro") #이 부분만 바꿔주면 된다
    robot_description = xacro.process_file(xacro_file)
    params = {"robot_description": robot_description.toxml(), "use_sim_time": use_sim_time}

    return LaunchDescription(
        [
            DeclareLaunchArgument(
                "use_sim_time", default_value="false", description="use sim time"
            ),
            Node(
                package="robot_state_publisher",
                executable="robot_state_publisher",
                output="screen",
                parameters=[params],
            ),
        ]
    )
실행
# Terminal 1
cd ~/ch2_ws
colcon build --symlink-install
source install/setup.bash
ros2 launch urdf_tutorial robot_2.launch.py

# Terminal 2
rviz2
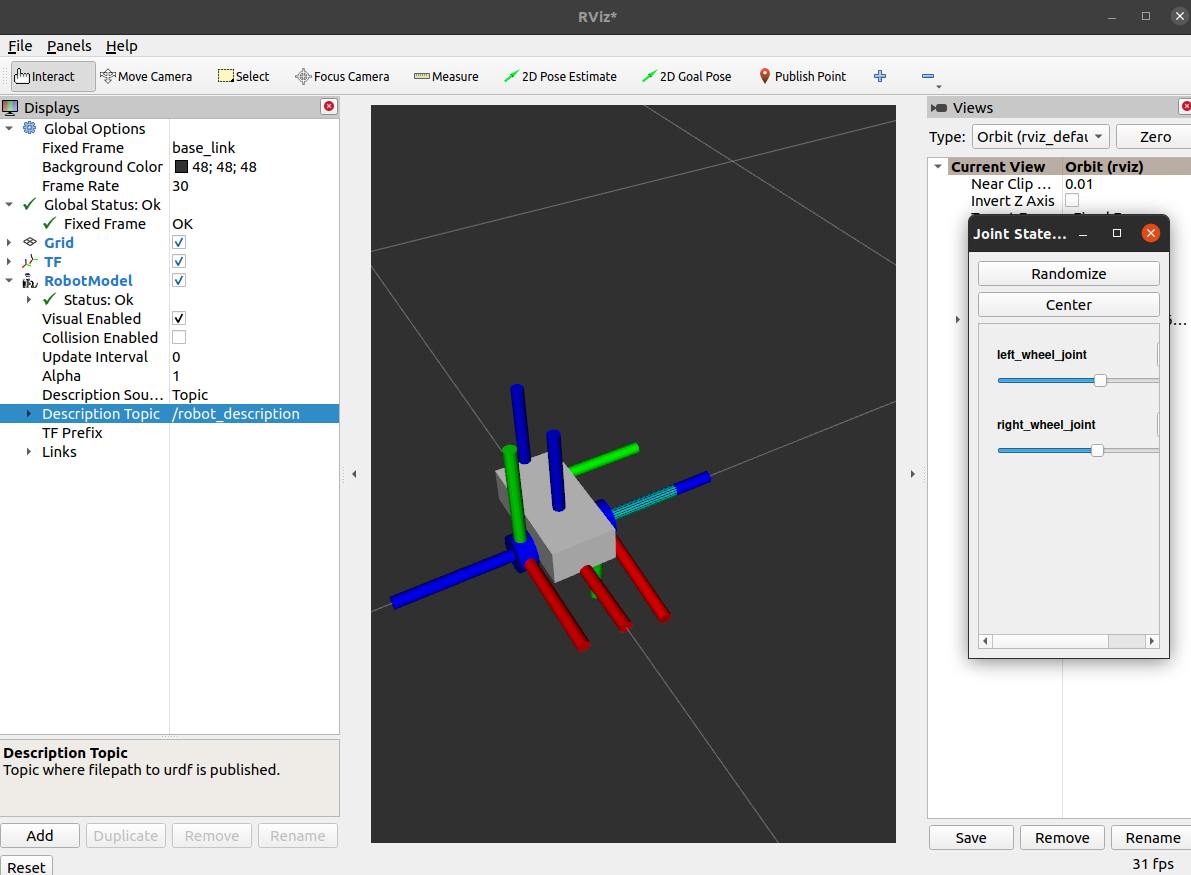
잘 보이진 않지만 뒷부분이(-0.12, 0, 0) body joint 원점이 base_link인것을 볼 수 있다.
자동차 바퀴
- 자동차에 바퀴 달기(left_wheel, right_wheel)
- robot_2.xacro 파일 편집
- left_wheel_joint는 base_link에 "continuous" 형식으로 부착
- left_wheel의 크기는 반지름 3cm, 폭 3cm
- left_wheel은 body의 왼쪽 바깥에 있어야 하므로 10/2 + 3/2 = 5 + 1.5 = 6.5(y축)
- left_wheel은 누워있으므로 x축을 기준으로 시계 방향 90도 회전
- left_wheel의 색깔은 파란색
<?xml version="1.0"?>
<robot xmlns:xacro="http://www.ros.org/wiki/xacro" name="urdf_tutorial">

    <!-- COLOR -->
    <material name="white">
        <color rgba="1 1 1 1" />
    </material>

    <material name="blue">
        <color rgba="0 0 1 1"/>
    </material>

    <!-- BASE LINK -->
    <link name="base_link">
    </link>

    <!-- BODY LINK -->
    <joint name="body_joint" type="fixed">
        <parent link="base_link"/>
        <child link="body"/>
        <origin xyz="-0.12 0 0"/>
    </joint>

    <link name="body">
        <visual>
            <origin xyz="0.1 0 0.03"/>
            <geometry>
                <box size="0.2 0.1 0.06"/>
            </geometry>
            <material name="white"/>
        </visual>
    </link>

    <!-- LEFT WHEEL LINK -->
    <joint name="left_wheel_joint" type="continuous">
        <parent link="base_link"/>
        <child link="left_wheel"/>
        <origin xyz="0 0.065 0" rpy="-${pi/2} 0 0" />
        <axis xyz="0 0 1"/>
    </joint>

    <link name="left_wheel">
        <visual>
            <geometry>
                <cylinder radius="0.03" length="0.03"/>
            </geometry>
            <material name="blue"/>
        </visual>
    </link>

</robot>
- rpy="-${pi/2} 0 0" => x축 시계방향으로 90도 회전
- <axis xyz="0 0 1"/> => 해당 조인트가 어떤 축을 기준으로 회전하는
실행을 시키면

이렇게 에러가 뜨게 된다.
에러의 내용은
No transform from [left_wheel] to [base_link]
ROS에서 두 프레임 간의 변환(transform)을 찾을 수 없다는 것을 의미한다. 이는 주로 로봇의 좌표계에서 특정 링크(여기서는 left_wheel)와 기준 링크(여기서는 base_link) 간의 변환이 설정되어 있지 않거나 올바르게 발행되지 않았다는 것을 나타낸다.
그래서 아래의 코드를 실행 시켜주면
ros2 run joint_state_publisher_gui joint_state_publisher_gui
오류도 사라지고 바퀴도 올바르게 생성된다.
위와 같은 방법으로 오른쪽 바퀴도 만들어준다.
오른쪽 바퀴
- right_wheel_joint 역시 base_link에 'continuous' 형식으로 부착
- right_wheel의 크기는 left_wheel과 동일한 반지름 3cm, 폭 3cm
- right_wheel은 body의 오른쪽 바깥쪽에 위치해야 하므로 y의 반대 방향으로 6.5cm 이동했다
- right_wheel은 누워 있으므로 x축을 기준으로 반시계 방향으로 90도 회전
- right_wheel의 색깔 역시 파란색
<?xml version="1.0"?>
<robot xmlns:xacro="http://www.ros.org/wiki/xacro" name="urdf_tutorial">

    <!-- COLOR -->
    <material name="white">
        <color rgba="1 1 1 1" />
    </material>

    <material name="blue">
        <color rgba="0 0 1 1"/>
    </material>

    <!-- BASE LINK -->
    <link name="base_link">
    </link>

    <!-- BODY LINK -->
    <joint name="body_joint" type="fixed">
        <parent link="base_link"/>
        <child link="body"/>
        <origin xyz="-0.12 0 0"/>
    </joint>

    <link name="body">
        <visual>
            <origin xyz="0.1 0 0.03"/>
            <geometry>
                <box size="0.2 0.1 0.06"/>
            </geometry>
            <material name="white"/>
        </visual>
    </link>

    <!-- LEFT WHEEL LINK -->
    <joint name="left_wheel_joint" type="continuous">
        <parent link="base_link"/>
        <child link="left_wheel"/>
        <origin xyz="0 0.065 0" rpy="-${pi/2} 0 0" />
        <axis xyz="0 0 1"/>
    </joint>

    <link name="left_wheel">
        <visual>
            <geometry>
                <cylinder radius="0.03" length="0.03"/>
            </geometry>
            <material name="blue"/>
        </visual>
    </link>

    <!-- RIGHT WHEEL LINK -->
    <joint name="right_wheel_joint" type="continuous">
        <parent link="base_link"/>
        <child link="right_wheel"/>
        <origin xyz="0 -0.065 0" rpy="${pi/2} 0 0" />
        <axis xyz="0 0 -1"/>
    </joint>

    <link name="right_wheel">
        <visual>
            <geometry>
                <cylinder radius="0.03" length="0.03"/>
            </geometry>
            <material name="blue"/>
        </visual>
    </link>

</robot>
양쪽 바퀴 둘 다 잘 나오는 것을 볼 수 있다.
'ROS2 > URDF' 카테고리의 다른 글
| ROS2 URDF(4) (0) | 2024.10.04 |
|---|---|
| ROS2 URDF(3) (0) | 2024.09.30 |
| ROS2 6일차(2) URDF (0) | 2024.09.27 |
| ROS2 6일차(1) URDF (0) | 2024.09.27 |
| ROS2 5일차(1) URDF (0) | 2024.09.26 |